Add Teleporting Copilot to Microsoft Mesh with Azure OpenAI - Guide and Code Sample 🤖
Learn how to add Generative AI to your Microsoft Mesh world!


In late May of this year, Microsoft added capabilities to Mesh that allow you to add AI into your custom experiences. These features are showcased in the Mesh 201 tutorial and in a blog post that Microsoft put out. In that blog post, some solutions created by me(!!!) were highlighted as an example of what partners like Sulava can do with AI in Mesh. Now in this blog, I thought I could share how I created one of these features, what I called a "Teleporting Copilot"!
What can we do with Generative AI in Mesh?
In an update to Microsoft Mesh and the Mesh Toolkit this spring, a feature was added that makes it possible to accept text input from the user. This makes it possible for a developer to take input and then pass it onto some logic implemented in the world, be it done with visual script or cloud scripting. With the power of Cloud Scripting, we can then go on and pass this text onto Azure OpenAI and it's GPT models, and create solutions stemming from that.
In my example, I created a "Teleporting Copilot", which helps users to navigate our Mesh world with simple textual commands. A user can for example say, "I want to go to breakout room 2", and then be instantly taken there, rather than looking for a button in the world to teleport them there. And because this feature is running GPT4 in the background, it can deduce the intent of the user from a variety of inputs. For example, if the user asks to "go to a place with a great view", the AI decides to teleport them to the observation deck. This also works with any language, so the feature completely eliminates language barriers!
To implement this, you should have some experience in creating Mesh experiences, especially with Cloud Scripting. If you're just starting out, you could check out my first blog post about creating Mesh experiences, or checking out the Mesh 101 and 201 tutorials.
How to configure your Mesh project for Azure OpenAI
First, you need to ready your world for the use of AI features. This means that you have to use Cloud Scripting, since you yet cannot connect to APIs with Visual Scripting. So you'll have to be able to write some C# to get all of this to work.
In this tutorial, I will be using Azure OpenAI for our AI backend, but you can use the OpenAI API, or any other you might want. This is of course something you have to configure beforehand, but you can find a lot of articles going through how to do that (for example the Mesh 201 tutorial).
To get started, open up your Mesh world project in Visual Studio. We'll need to first add the Azure OpenAI Service variables to our project. Under appsettings.json, add the API URI and API KEY to both the Production and UnityLocalDev files. This way you can test your code in Unity, and the environment variables will also be pushed to Azure when you release your world.

Next, head over to your .csproj-file and add the following reference to the Azure OpenAI package. This adds the required dependencies to your project:

Now head over to your main file: App.cs, and add the Azure and Azure OpenAI packages to the file:
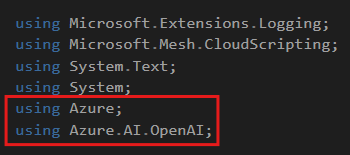
We also need to configure the OpenAIClient to use our environment variables in our config files. This can be done by adding a few lines to the App object:

Now were ready to start creating our AI experience!
How to add AI Button to your Mesh world
Now we're ready to actually get started. The idea for the teleporting copilot is quite basic when you break it down into parts. What we need to create is the following:
- Some sort of button that when clicked, asks for user input for where they want to teleport in the world
- AI will take that input, and deduct a place where the user should be teleported.
- The AI response will be passed on as an argument, and the user will be teleported to a specific TravelPoint in the world
In my world, I have an object that's a Copilot logo, and it has a nice animation when the user hovers over it (This was created by my colleague Pekka, thanks!).
In my Cloud script, I add this object like usual, and then listen to when an user clicks onto it. I also fetch all of my travel points from the world, which I have for breakout rooms 1-4 and the observation deck.
// Get the Copilot button and it's InteractableNode
var AIbutton = _app.Scene.FindFirstChild("AI_Activate", true) as TransformNode;
var AIbuttonInteract = AIbutton.FindFirstChild<InteractableNode>();

// Get the Travel Point Group and all of the TravelPointNodes from inside it
var TPgroup = _app.Scene.FindFirstChild("Travel Point Group", true) as TransformNode;
var breakout1 = TPgroup.FindFirstChild("teleportd_room1", true) as TransformNode;
var TP1 = breakout1.FindFirstChild<TravelPointNode>();
var breakout2 = TPgroup.FindFirstChild("teleportd_room2", true) as TransformNode;
var TP2 = breakout2.FindFirstChild<TravelPointNode>();
var breakout3 = TPgroup.FindFirstChild("teleportd_room3", true) as TransformNode;
var TP3 = breakout3.FindFirstChild<TravelPointNode>();
var breakout4 = TPgroup.FindFirstChild("teleportd_room4", true) as TransformNode;
var TP4 = breakout4.FindFirstChild<TravelPointNode>();
var obsdeck = TPgroup.FindFirstChild("teleportd_vt", true) as TransformNode;
var TPobs = obsdeck.FindFirstChild<TravelPointNode>();
Now that we've fetched all components, we can get started. The logic behind the teleport copilot is quite simple, and very much a quick demo. The main idea is that we instruct the AI (in this case GPT4), to take the user input, and just output where it thinks the user wants to travel. I created a system message that instructs it very clearly to function, and have found that it works around 90% of the time. Of course you could make it better, but this is what I initially came up with:
"Your task is to figure out where users want to travel. Users can travel into one of four breakout rooms, or the observation deck. If you deduce a user wants to travel to breakout room 1, you output 'breakout1', if they want to go to breakout room 2, you output 'breakout2' and so on. If they want to go to the observation deck, you output 'deck'. If you cannot deduce where users want to travel, just say 'I'm not sure where you want to go'.' Your answer should only include the word, like 'breakout1', 'breakout3', or 'deck'. You should always just answer with the specified format without spaces or other formatting."
In the button click handling, we get user input by using the ShowInputDialogToParticipantAsync -method. We then pass the user input asynchronously to Azure OpenAI, and wait for a response.
// This code gets run when the button gets clicked
AIbuttonInteract.Selected += (sender, args) =>
            {
                // Showing the user the dialog box to input text
                _app.ShowInputDialogToParticipantAsync("Where do you want to go? ", args.Participant).ContinueWith(async (response) =>
                {
                    // Saving the user prompt into a variable which gets pushed to the AI
                    string userprompt = response.Result;
                    var chatCompletionsOptions = new ChatCompletionsOptions()
                    {
                        // You need to change the DeploymentName to the one you have in Azure OpenAI
                        DeploymentName = "chatgpt",
                        Messages =
                        {
                            new ChatRequestSystemMessage("Your task is to figure out where users want to travel. Users can travel into one of four breakout rooms, or the observation deck. If you deduce a user wants to travel to breakout room 1, you output 'breakout1', if they want to go to breakout room 2, you output 'breakout2' and so on. If they want to go to the observation deck, you output 'deck'. If you cannot deduce where users want to travel, just say 'I'm not sure where you want to go'.' Your answer should only include the word, like 'breakout1', 'breakout3', or 'deck'. You should always just answer with the specified format without spaces or other formatting."),
                            new ChatRequestUserMessage(userprompt)
                        }
                    };
After that is done, we can receive the response from the API, and start teleporting our user based on that. I did this with a very simple switch-case, that just goes through every option. Now I know this is not a very elegant solution and not the best way to go at this, but it's what I found to work best in the limited time I had back when I created this feature.
try
    {
        // Get the AI response and save it to content-variable
        Response<ChatCompletions> aiResponse = _openAIClient.GetChatCompletions(chatCompletionsOptions);
        ChatResponseMessage responseMessage = aiResponse.Value.Choices[0].Message;
        _logger.LogInformation($"{ responseMessage.Content}");

        // Transform response to lowercase to increase reliability
        content = responseMessage.Content.ToLower();

        // Switch case to go through every single one of the travel points and compare it to the response of the AI, includes debug logger lines!
        switch (content)
        {
            case "breakout1":
                _logger.LogInformation("User wants to travel to Breakout room 1");
                _app.Scene.GetAvatarForParticipant(args.Participant).TravelTo(TP1);
                break;
            case "breakout2":
                _logger.LogInformation("User wants to travel to Breakout room 2");
                _app.Scene.GetAvatarForParticipant(args.Participant).TravelTo(TP2);
                break;
            case "breakout3":
                _logger.LogInformation("User wants to travel to Breakout room 3");
                _app.Scene.GetAvatarForParticipant(args.Participant).TravelTo(TP3);
                break;
            case "breakout4":
                _logger.LogInformation("User wants to travel to Breakout room 4");
                _app.Scene.GetAvatarForParticipant(args.Participant).TravelTo(TP4);
                break;
            case "deck":
                _logger.LogInformation("User wants to travel to Observation deck");
                _app.Scene.GetAvatarForParticipant(args.Participant).TravelTo(TPobs);
                break;
            default:
                _logger.LogInformation("Unspecified " + content);
                break;
        }
    }
And that's it! You now have your own teleporting copilot in your Mesh world! I recommend running it in the Unity Player first, to make sure that you have configured the system message correctly and AI can deduct the user intent reliably. The various debug logger lines in the code make it much easier to do!
If you want to take a look at the full code, you can find it in my GitHub and implement it in your own projects:
 Hylje5000
Summary
This all was just one of my deep dives into the possible use cases for Generative AI in Microsoft Mesh. Especially when we get access to voice input in cloud scripting, I think the sky will be the limit for whatever we can create. Adding features like this into our Mesh worlds will unlock new possibilities and even make our worlds for accessible with the ability to go through language barriers and make navigating the world easier for people who aren't so well versed in immersive 3D worlds.
Special thanks to Microsoft for giving me early access to a version of the Mesh toolkit back in May to enable me to create these things. It was truly awesome to bring my wild ideas to life! 🤩